icomet 是一个使用 C++ 语言开发的支持百万并发连接的 comet 服务器, 使用了 libevent 网络库. 支持并发连接数高, 内存占用少, 性能优越. 支持的浏览器和操作系统平台包括: Safari(iOS, Mac), Firefox/Chrome(Windows,
Mac), IE6+。
项目主页: https://github.com/ideawu/icomet
测试客户端iCometClient4j:https://github.com/kyleduo/iCometClient4j
APP Demo示例:https://github.com/ideawu/icomet-demos
html案例:http://pan.baidu.com/s/1o8SMbpC
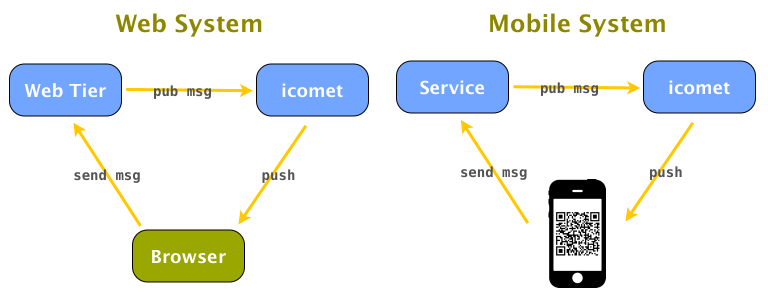
iComet 在 Web 系统和移动应用系统中的角色

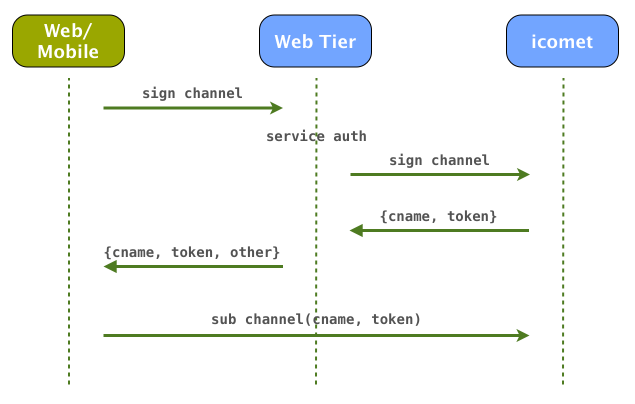
iComet 的工作流程

icomet 分布式
icomet 本身没有分布式方面的工具. 我可以说一个思路: 1. 部署多台 icomet-server 实例. 2. 用户调用 sign 申请通道时, 根据 uid 哈希到其中一台. 3. 当往用户推送消息时, 根据uid哈希推送到他所在的那一台icomet-server上.
如果你可以开发, 那便写程序订阅 psub 接口, 在一个中心节点保存uid和icomet-server的对应关系(路由表).
支持百万并发连接 C1000K
需要两个步骤:
1.编译安装,运行
wget --no-check-certificate https://github.com/ideawu/icomet/archive/master.zip
unzip master.zip
cd icomet-master/
#开启服务
make
./icomet-server icomet.conf
# or run as daemon
./icomet-server -d icomet.conf
# stop
./icomet-server icomet.conf -s stop
#订阅
curl -v "http://127.0.0.1:8100/sub?cname=12"
# open another terminal 发布
curl -v "http://127.0.0.1:8000/push?cname=12&content=hi"
2.客户端html的使用(long-pulling.html)
<!DOCTYPE html>
<html>
<head>
	<meta http-equiv="Content-Type" content="text/html; charset=utf-8">
	<title>iComet long-polling demo</title>
	<script src="/web/js/jquery-1.9.1.js"></script>
	<script src="/web/js/icomet.js"></script>
</head>
<body>
<h3>Server push messages:</h3>
<div id="output"></div>
<script>
var count = 0;
var comet = new iComet({
	channel : 'testChannel',
	subUrl : 'http://192.168.10.58/icomet/sub',
	callback : function (content, type) {
		count ++;
		var output = document.getElementById('output');
		var time = '' + (new Date());
		output.innerHTML += count + '. ' + time + ': (' + type + ') ' + content + '<br/>';
	}
});
</script>
</body>
</html>
3、怎么去使用
## How to Use?

1. start icomet-server

2. open long-polling.html in web browser(Firefox, Chrome, Safari, etc)

3. open a command line terminal, execute

curl "http://127.0.0.1:8000/icomet/push?cname=testChannel&content=内容"
用浏览器的话,OK,先打开long-pulling.html进行监听,然后再打开另外一个窗口或浏览器访问http://127.0.0.1:8000/icomet/push?cname=testChannel&content=内容,其中cname是聊天的频道,只能跟相对应的频道发消息,content就是消息内容。
4、项目中如何使用(PHP)
不同的系统换不同的方式结成,道理都一样,tp3,tp5,yii2, laravel5...自己去搞定,我这里以tpframe(tp5来举例)
单聊OR群聊??? 不管是哪种,你知道原理了都知道怎么做,反正都是频道号为准,如果是单聊(两个人),那就单独开一个频道号,两人加入,如果群聊,须要聊天的人只须要进行创建好的频道就可以了,我这里以单聊为例说明一下,主要代码:
<?php
// +----------------------------------------------------------------------
// | Author: yaoyihong <510974211@qq.com>
// +----------------------------------------------------------------------
namespace app\frontend\controller;
use \tpfcore\Core;
class IComet extends FrontendBase
{
    /*
        创建聊天频道方法,开启会话的人首先要进入的页面
        频道号可以用某种方式创建(保证唯一),存入数据库之类的,方便其它人加入该频道聊天,我这里随便写一个频道用于测试
    */
    public function createChannel()
    {
        $this->view->engine->layout(false);
    	return $this->fetch("chat",[
            'channelName'=>"channel20158"
        ]);
    }
    /*
        添加进入聊天频道
        其实addChat与createChannel可以弄一起,实际项目可以去进行改进
    */
    public function addChat()
    {
        $this->view->engine->layout(false);
        return $this->fetch("chat",[
            'channelName'=>"channel20158"
        ]);
    }
    /*
        发送消息
        很简单的一个发送,要数据要怎么处理,自己去实现
    */
    public function sendMsg()
    {
        $channelName=input("channelName");
        $content=input("content");
        $result=file_get_contents("http://192.168.10.58/icomet/push?cname=$channelName&content=$content");
        return json_decode($result,true);
    }
}
然后就可以用浏览器打开:http://192.168.10.58/Icomet/createChannel创建一个频道
然后新开窗口访问http://192.168.10.58/frontend/Icomet/addChat加入频道进行聊天,图我就不上了
OK,自己去进行一些基本的改进就可以进行单聊或群聊了。
最后附上配置文件代码(我是用nginx搭建的)
在server{}之间加上:
location ~ ^/icomet/sse|sub|see.* {
    rewrite ^/icomet/(.*) /$1 break;

    proxy_read_timeout 60;
    proxy_connect_timeout 60;
    proxy_buffering off;
    proxy_pass   http://127.0.0.1:8100;
}
location ~ ^/icomet/push|sign.* {
    rewrite ^/icomet/(.*) /$1 break;

    proxy_read_timeout 60;
    proxy_connect_timeout 60;
    proxy_buffering off;
    proxy_pass   http://127.0.0.1:8000;
}
参考文章:http://blog.csdn.net/zhu_tianwei/article/details/43953657
有问题欢迎一起研究。。。
 007
007